

Written by Tadashi
Modified & Updated: 18 May 2024
Reviewed by Sherman Smith
YouTube has been a part of our lives for years, but there’s still much to discover about it. Learn more about this online video streaming site with these Youtube facts.
- Over 500 hours’ worth of video content gets uploaded to YouTube every minute.
- YouTube is the second-most popular website on Earth.
- YouTube earns around $15 billion a year.
- Around 1.8 billion users visit YouTube every month.
- About 37% of all mobile traffic in the world goes to and from YouTube.
- Steve Chen, Chad Hurley, and Jawed Karim launched YouTube in February 2005.
- YouTube had 8 million users per day by December 2005.
- 65 million videos were getting uploaded to YouTube by July 2006.
- Google bought YouTube in October 2006 for $1.65 billion.
- Google+ integrated YouTube and Chrome in November 2011.
- YouTube introduced a new interface in December 2011.
- YouTube introduced Music Key in November 2014.
- By 2017 users watch around a billion hours of videos on YouTube every day.
- YouTube introduced its current logo in August 2017.
- YouTube’s user base expanded greatly during the coronavirus pandemic of 2020.
- Youtube made the first free worldwide online broadcast of a major sporting event in 2010, with 60 cricket matches of the Indian Premier League.
- YouTube supposedly joined PRISM, the US NSA’s online surveillance program, in 2010.
- The White House has its own YouTube channel.
- Criticisms of YouTube include their servers promoting videos about conspiracy theories, fake news, and fringe beliefs.
- Journalist Jonathan Albright once accused YouTube of being a conspiracy ecosystem.
YouTube Facts Infographics
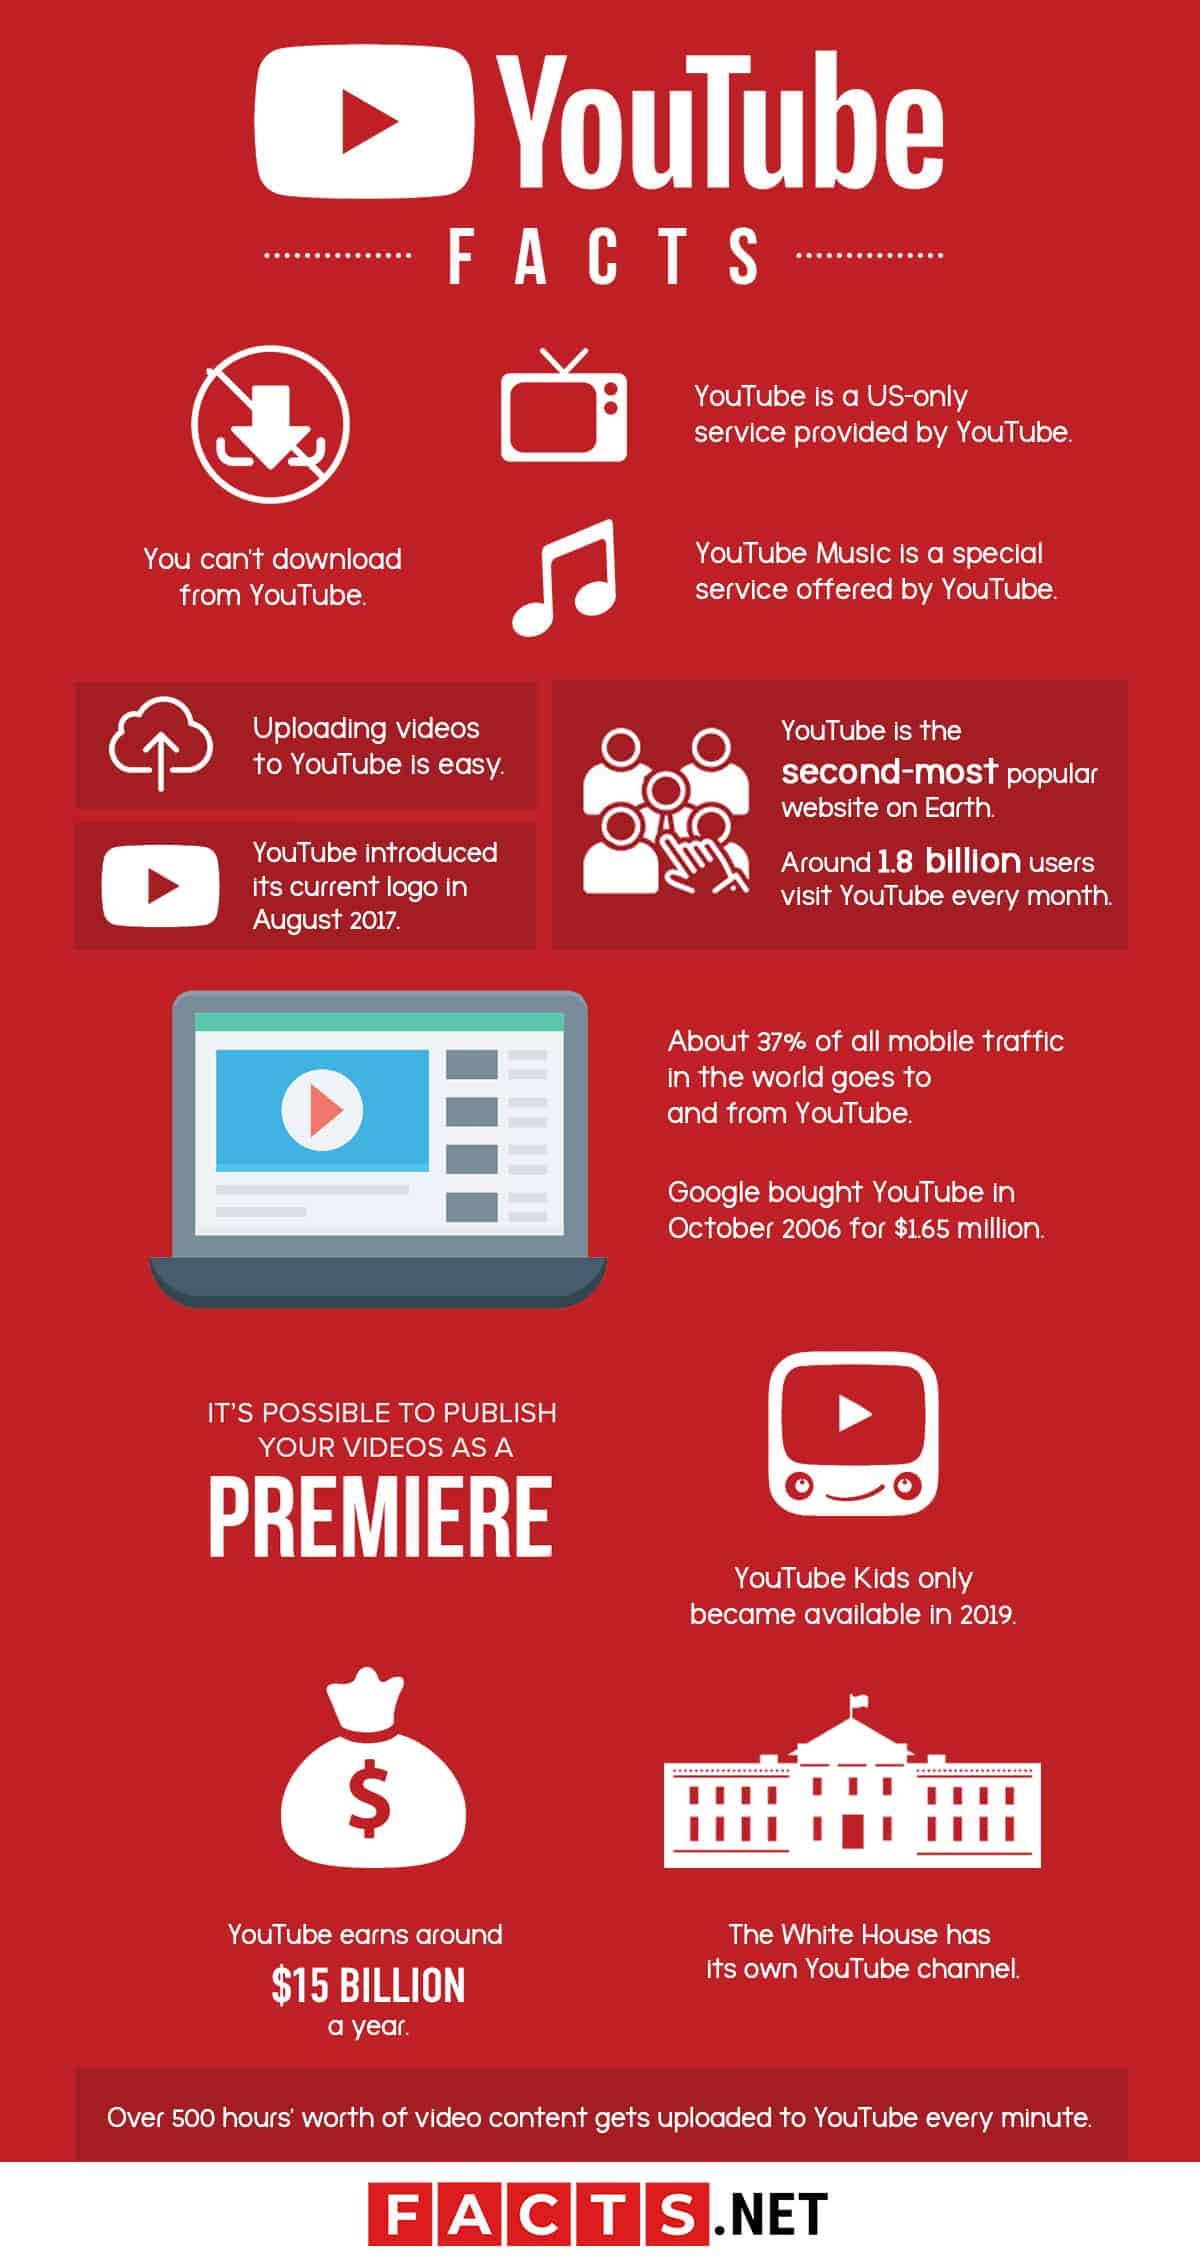
You can’t download from YouTube.
Youtube’s in-app download feature only lets you save videos to watch offline on the the app. To download YouTube videos onto your devices, you’ll need special tools or software available elsewhere on the web. That said, YouTube is not responsible for any legal or technical consequences from using unsupported software to download videos from the site.
YouTube TV is a US-only service provided by Youtube.
The service allows subscribers to watch live TV on YouTube, and also offers video on demand and video recording options. However, it is a monthly-paid subscription. Supported networks include ABC, NBC, Fox, CNN, and ESPN among others.
YouTube Music is a special service offered by YouTube.
The focuses on streaming music and videos alike. Specially-programmed filters allow users to find their preferences, including genres, artists, and even playlists. A premium version is available for a monthly fee, including exclusive features such as ad-free playback and download services.
Uploading videos to YouTube is easy.
As simple as accessing the Upload Video option in YouTube. Then you only need to find and select the video you want to upload from your device. Once you’ve selected it, YouTube automatically uploads it to the site.
There are various basic options to customize your video.
These include giving your video a title and description, for starters. You also have the option of adding tags to your video. This helps other users find it on search, or by category.
Advanced options are also available to customize your video.
Some more advanced features of Youtube’s editor include classifying your video as a paid promotion. You can also add tags and sort your video into appropriate categories to help people find and filter for your video on search.
You can also upload subtitles, and add information on when and where you video made your video. Licenses and copyright disclosure options are also available, as is the option whether or not to let the audience leave comments on your video.
You can also make money off your videos on YouTube.
However, you have to be a YouTube Partner first. Once you are, then you have the option of monetizing your video. This lets you gain money from your videos’ viewership, with YouTube getting a share of your profits in exchange for them letting you sell. Talk about mutually-profitable YouTube Facts.

Not anyone can become a YouTube Partner.
Before you can monetize your videos. there’s a list of qualifications that you need to meet to become a YouTube Partner. First off, you have to live in a country where the YouTube Partner Program is available. Second, your videos have to reach a viewership of 4000 hours in one year. Third, you’ll need more than 1000 subscribers on your channel.
Once you meet these conditions, YouTube will first conduct a private assessment to see if you are eligible for the program. Overall, this process usually takes 1 month to finish.
You can add end screens to your Youtube video.
This is another advanced option available when uploading your video. However, note that your video needs to be at least 25 seconds long for you to use this option.
You’ll need to publish your video before anyone can see it.
Uploading your video isn’t enough – you need to publish it, too. Otherwise, it’ll sit in your videos without anyone able to see it. Once you finish publishing it, though, your video then becomes available for viewing by the public.
It’s possible to publish your videos as a premiere.
You can do this with the Schedule option. Schedule lets you choose the time and date that your video becomes viewable by the public. Until then, your video stays private but fully-published and ready for viewing. You can also adjust the time and date whenever you want.
You can’t upload audio files on YouTube.
YouTube does not support audio files. Hence, any attempt to upload an audio file to the site will automatically fail.
YouTube automatically adjusts dimensions for any uploaded videos.
It doesn’t matter whether your videos’ orientations are vertical or horizontal. There’s also no need to put frames around your video, such as black bars on either side, as YouTube automatically adjusts the video for the best resolution and positioning.
YouTube Kids only became available in 2019.
Originally designed for Android and iOS, YouTube Kids became available on PC in August 2019. Content on YouTube Kids is specially-filtered to ensure only material suitable for children aged 12 and below becomes available. There are also parental control functions available on YouTube Kids, which lets parents monitor what their children get to see.
The Trending option lets you see the most viewed videos on the site.
Trending also offers several filters to sort the top videos into categories for your convenience. These include fashion and beauty, gaming, movies, music, and news.
The Subscription option is right under the Trending option.
This options lets you find all the recent uploads of users you’re currently subscribed to. A very convenient example of YouTube Facts to be sure.
The Library option is the next option available after Trending.
In Library, you’ll find the most recent videos in several categories. This includes your watch history, videos you’ve marked to watch later, and your playlists and liked videos. YouTube only shows 8 videos per category, but you do have option of going to the main category page. And there you can view all the videos in each category.
History has all the videos you’ve ever watched.
Of course, YouTube doesn’t show them all at the same time. The number of videos shown varies with each browser. Once you reach the end of the shown videos, the page auto-updates to show more videos. Auto-update ends only when you reach the very first video you watched on YouTube.
You can only see History in list view.
YouTube doesn’t allow for History in grid view. That said, History also arranges your watched videos by date. This way, there’s organization beyond simply listing your watched videos from newest to oldest.
History lists more than your watched videos.
Watched videos, or ‘Watch history’, is only the default setting of Youtube’s History tab. You can find other settings on a column to the right side of the page. This includes ‘Search history’ for all the keywords you’ve ever used in YouTube search and ‘Comments’ for all the comments you’ve ever posted on other people’s videos.
In ‘Community’ you can find all the community activities you’ve joined, and in ‘Live chat’ you can find all the live chat messages you’ve ever sent.
History also has other options available.
Through History, you can also clear or pause your watch history. Note that if you clear your watch history, you can’t recover it. It’s gone forever. Similarly, if you pause watch history, there won’t be any record of videos you watch while history’s paused. Finally, there’s an option to manage all your activities, which sends you to Google’s My Activity page.
You can manage the videos in Subscription.
For videos in Subscription, the default setting is a grid type view. However, you can switch it to a list type. It’s still newest to oldest, but with list view, you can also see which subscription each video belongs to.
Your Videos also shows videos you haven't uploaded yet.
This tab includes both the ones you’ve published and the ones you’ve only uploaded and haven’t published yet. Links to your channel and the option to go live are also found here.
You can find all your playlists listed after Your Videos.
The ones on top are the ones made by YouTube for all accounts. ‘Watch Later’ is first, followed by ‘Liked videos’. Then the playlists you made follow, with the newest on top and the oldest at the bottom.
Watch Later and Liked Videos are default.
There’s no option to change them, either. Only you and those you indicate as account moderators and approved users can see them.
You can make a playlist private.
Open the playlist, and look for a dropdown menu below the playlist’s title. Though default private, you can set them to either public viewing or unlisted. If set to public viewing, then anyone can find and watch the playlist. If unlisted, then you’ll need to share a link to your playlist for others to find and watch it.
You can find your subscriptions under your playlists.
Unlike other lists, your playlist subscriptions are in reverse order. That is, they’re listed with your oldest subscription at the top and the newest subscription at the bottom.
The option to browse Channels is under your newest subscription.
The Browse channels options lets you see the top Channels on YouTube at present. They’re also sorted for your convenience, into various categories such as music, comedy, and gaming among others. Click any of them to view and subscribe to a channel.
You can find More from YouTube under your subscriptions list.
This tab includes the option to upgrade to YouTube Premium. You can also find links to other YouTube special services, such as YouTube Music, Gaming, Live, and Fashion & Beauty. The latter three are special Channels run by YouTube dedicated to helping you find and watch users and videos in those specific categories.
You can find even more options under More from YouTube.
Other options under the More from Youtube tab includes YouTube’s settings, and ‘Report history’, which has all the reports you’ve ever submitted to YouTube. The ‘Help’ option is also here, along with the option to give feedback to YouTube.
You can find minor options listed in fine print under the previously-mentioned options.
This includes YouTube’s ‘About’ page, pages for their press and copyright policies, their contact details, and information about YouTube’s creators. You can also find pages on advertising policy, development, terms, and privacy here. Links to YouTube’s general policies and safety measures as well as testing of new features are also here.
YouTube supports live-streaming.
This feature is YouTube Studio. You can access this feature through the camera-shaped icon at the upper right of the page. It’ll send you straight to the YouTube Studio page. Don’t worry: it’s free.
You’ll need to verify your identity before going live.
YouTube needs to make sure you’re an actual person and not a bot before you can start using YouTube Studio. Select your country of origin first, then select how YouTube sends you the verification code. They’ll either call or text it to you. Once you’ve selected your preferred method, wait for the code to arrive. When you get it, type the code into the indicated field to finish verification.
It takes time to set up your account for YouTube Studio.
Specifically, it takes 24 hours or a whole day to set it up. After the verification process, YouTube handles the setup all on its own.
There are three ways to stream on YouTube Studio.
The first is through your mobile device, which is the easiest as you don’t need any additional hardware. Your phone’s built-in camera and microphone are all that’s needed, though you can use external hardware such as lenses and an accessory mike if you want.
For your PC, it depends if you have a built-in camera and microphone. If not, then you’ll need additional hardware. Finally, you can use encoder software to stream on YouTube Studio, though this is usually only when you’re streaming a game on your PC or mobile device.
Starting a live stream is easy.
Entering YouTube Studio automatically opens ‘Webcam’, with a popup to input details of the stream. This includes the stream’s title, and whether the stream is public, private, or unlisted.
There’s also a slider, which allows you to set a future time and date for the stream. You also must declare whether the stream is child-friendly or not, though the option to declare the stream as rated 18 and above is optional. Once you’ve satisfied the requirements, then you can start streaming right away.
YouTube Studio has its own chat.
Once you start a stream, you have the option to chat with your audience, and for your audience to chat with you. The chatbox makes up the whole column on the right side of the page. Replies have a maximum limit of 200 characters for every message.
You can find your stream options under 'Stream.'
This is also the first option available in the options menu on the left side of the page. With this option, YouTube Studio shows the stream options in a column in the middle of the page. You’ll find the stream preview at the top left, with the stream’s title, category, and the number of viewers and likes, listed to the right of the preview. Below the preview are 3 tabs, default open on ‘Stream settings’.
You can find your Stream Key in Stream settings.
It’s listed below the stream preview, in the ‘Stream settings’ tab. The Stream Key is normally obscured for security purposes, but you do have the option of exposing the Stream Key. You also have the option of copying the Stream Key directly to your device’s clipboard.
The Stream Key is automatically generated.
It doesn’t have to be, though. YouTube gives you the option of generating a Stream Key yourself. You’ll have to give a title and description, of course, and then select your stream’s bitrate.
Note that once the stream begins, you can’t change either the bitrate or the number of frames per second. You also have the option to select 60 frames per second for your stream, though this option is off by default.
The Stream URL and its backup are below the Stream Key.
Unlike the Stream Key, the Stream URL and its backup aren’t obscured. You can copy and paste them for sharing with others, or directly copy both of them to your clipboard.
Stream settings include the option to add a delay to the stream.
Normally there’s no delay, but you have the option of adding one. Specifically, you have a choice of either a 30 or 60-second delay.
The Edit option is next to your stream’s preview screen.
With this you can edit your stream’s information, such as the title and description among others. You can edit them in any way you like, but don’t forget to click save when you’re done, otherwise, your changes will get deleted.
The Analytics tab is next to Stream settings.
In Analytics, you’ll find the list of all your streams, both active and not. You’ll also find there how many viewers each stream had, their chat rate, the number of playbacks, and the average watchtime.
Stream Health is the last tab.
Here you can find the status of your stream, and whether it’s working or not. You’ll also find displayed here any important messages from YouTube about your stream.
You can manage your streams in Manage.
You’ll find all your streams listed here, along with a summary of their analytics. Select any of them to get the option of editing their description, visibility, and even if they’re child-friendly or not. You’ll also have the option of deleting the selected stream, but remember that you cannot recover any deleted streams.
YouTube Studio limits the number of streams listed at a time.
Youtube’s default stream number is 10, but you can change that. Go to the bottom of the page, and open the dropdown menu next to the number of rows per page. You can select between either 30 or 50, or even return to only 10 per page.

Stream Now Classic is the last option on YouTube Studio’s menu.
This option sends you to another page, with a simplified version of YouTube Studio. This includes a preview of your stream, and right below it the option to change your stream’s thumbnail. Below that option is a trio of tabs, default open to ‘BASIC INFO’.
This includes your stream’s title, description, category, and privacy settings. Listed below them are your Server URL and Stream Key. Note that unlike in YouTube Studio, Stream Now Classic does not have the option to change your Stream Key.
Stream Now Classic has chat and analytics too.
You can find them at the lower right of the page. The chatbox is on top, and again, messages have a maximum limit of 200 characters at a time. Analytics is also limited to the number of viewers at the present, and how messages are getting sent on chat every minute. There’s also a tab next to Analytics that lets you see your stream’s status.
Chat in Stream Now Classic has slow mode.
Activating this mode allows you to set a delay between messages getting posted on chat. Default set to 60 seconds between messages, you can adjust the delay as you want.
Stream Now Classic includes a stream checklist.
Youtube’s Stream Now checklist enumerates the requirements for a successful stream. This include streaming software, description of your stream, and information from YouTube on features you can add to your stream, such as monetization among others. YouTube also adds to the checklist a short set of instructions on how to launch and end a stream.
Next to Stream Now Classic’s Basic Info tab is Stream Option.
The first of those options is to enable DVR, allowing viewers to back up your stream for up to 12 hours after the stream. Below is a list of latency options, along with their descriptions. The default latency option is Low-Latency, allowing for near-real-time interaction and minimum buffer time for the stream’s playback.
The final tab in Stream Now Classic is Cards.
This allows you to add interactive options to your stream. Cards let you link to other videos, users, and even websites. The Add card option lets you see a list of all the cards you’re able to make. Selecting any one of them opens a popup with details and instructions on how to make the card.
Getting back to YouTube Studio from Stream Now Classic is easy.
At the top of the page, there’s an icon labeled ‘GO TO LIVE CONTROL ROOM’. Using it sends you back to YouTube Studio immediately.
YouTube Studio has a share feature.
You can find it at the top of the page, marked with an icon shaped like an arrow. Said icon has a list of all the sites you can share to. These include Facebook, Twitter, reddit, Tumblr, and Pinterest among others. You also have the option of sharing your stream at a certain time into the stream, and not from the start.
YouTube Studio has additional settings of its own.
You’ll find this option next to the share icon. Using this option opens a popup, default showing the Details settings first. From here, you can set whether or not to allow embedding and declaring your stream as paid or not. There’s also an option to add a disclaimer to your stream if it’s a paid one.
In addition to Details, there’s also Live Chat settings.
These settings include whether Live Chat is on or off in the first place, and whether or not to enable Live Chat to replay. You can also turn on slow mode for YouTube Studio’s chat here, as well as the option to set how long the delay between messages will last.
Chat settings are on top of the chatbox in YouTube Studio.
Options include viewing the list of participants in your chat, as well as opening the chat in a separate window. There’s also the option to show or remove the time stamps for the messages in the chatbox.
Going to YouTube Studio’s Dashboard page is easy.
You can find this option in the profile menu at the top right corner of the page. It’s labelled as Your channel, and if selected, sends you back to the Dashboard immediately.
YouTube Studio’s Dashboard has several features.
On the left side, you’ll find the options menu. The space to the left contains several boxes for other features, such as the summarized metrics and analytics of your videos. They also include the latest news about YouTube, and even insider pieces on YouTube’s staff and owners. You can also find notifications about any issues YouTube is currently facing on the Dashboard.
It’s simpler to upload or go live on YouTube Studio’s Dashboard than on the main YouTube page.
You can access these features with the icon labeled ‘Create’. But the Dashboard also has links for either uploading videos or going live, with no need to open the dropdown menu beforehand. The icon with an arrow pointing up above a horizontal line represents the option to upload a video. And if you want to go live, then the icon with a dot surrounded by waves on both sides is what you’re looking for.
YouTube Studio’s options include Comments.
Here, you can view all the comments other people left on your Channel, whether they’re your subscribers or not. You can even manage them, such as thumbing them up or down, or even reply to them.
If the comment offends you for any reason, you can also report them by opening the dropdown menu to the right of the comment. There you’ll find the option to bring the moderators’ attention to the comment in question.
There are other options available when managing comments on your Channel.
In addition to reporting them, you can also simply delete the comment from your Channel. You can also hide your Channel, making it so the person who wrote the comment can neither see nor comment again on your Channel.
YouTube Studio filters comments on your Channel for spam.
This is an automated process, and any comment that meets the programmed conditions gets marked as spam. You can see them by simply opening the Spam tab.
Subtitles is another option on YouTube Studio.
Here, you can see all the subtitles attached to your uploaded videos. The Drafts option lets you see any subtitle files that you haven’t attached to any of your videos. In Community, you can turn on the feature to let other YouTube users know you’re giving them the chance to make and submit subtitles for your videos. And in the Published, you’ll see only the subtitles attached to your videos already published and visible to the general public.
YouTube Studio includes an audio library.
The library includes many free musical pieces and sound effects for you to use with your streams. You can access the audio library through the options menu on the left side of the YouTube Studio Dashboard page.
YouTube Studio allows access to settings.
The default tab is for general settings, though there’s only one. That’s for currency units, which in turn is default set to the US Dollar.
You can change this using the dropdown menu to select your preferred currency to pay with for online services. Don’t forget to save your changes when you’re done.
Basic Info is the default tab when opening Channel settings.
Here, you can see your username, and the option to change it. The option to add keywords to your Channel is here, to help other users find your Channel using YouTube’s search function. You can also select your country of origin here, using the dropdown menu, for display purposes on your channel. Finally, the option to customize your Channel is also here. Don’t forget to save when you’re done.

More options are available in the Advanced settings tab.
This includes whether your videos are child-friendly or not, default set to you needing to individually say so for every video you upload. You can set it to a blanket declaration that all your videos are child-friendly though, or the opposite, that is, none of your videos are child-friendly.
You also have the option of linking your Channel to a Google Ad account, and whether or not to show your number of subscribers on your Channel. You can also find the links to advanced Channels settings, managing your YouTube account, and Channel deletion, here.
Advanced Channel Setting offers even more options for you.
One of those is the option to change your YouTube username, as well as your profile picture. You can also find the option to turn on interest-based ads here, as well as the option to link your Channel to an AdWords account. You can associate your Channel with another website here, as well as the options to let other people see your Channel on their recommended Channels. Finally, you can also add a Google Analytics ID here.
Hiding or deleting your Channel is easy.
You can find this option in the Advanced settings tab. You’ll need your password to confirm your identity with, after which you’ll have the option of either hiding or deleting your channels. Either option opens a dropdown menu with the details of either option and then a link to confirm. You’ll need to indicate you understand the consequences listed on the page, and only then will YouTube allow you to either hide or delete your account. A rather final example of YouTube Facts, as we see it.
The Branding tab lets you add a watermark to your videos.
This option lets you associate your Channel and videos to certain brands. Watermarks must either be a GIF or PNG file, with dimensions of 150 pixels by 150 pixels, and reaching no more than 1 MB in size.
Feature eligibility is the last tab in Channel settings.
Here you can find those YouTube features you’re eligible for. From here, you can toggle some of them on or off.
Upload Defaults is another option in settings.
Here, you can set defaults for any videos you upload. In ‘Basic info’ you can find the title, description, and visibility options. Titles have a maximum limit of 100 characters, and descriptions have a maximum limit of 5000 words. Description has the option of setting your video as public, private, or unlisted.
Upload Defaults has its own set of advanced settings.
This includes license, default set to the standard YouTube licence, though you have the option to set it to Creative Commons instead. There are also category options, video language, caption, and comment settings. You also have the option of letting your audience see your video ratings or not.
Permissions is another option in settings.
Here, you can find the option to manage your permissions. In particular ‘MANAGE PERMISSIONS’ sends you to the main Google Brand Accounts page.
Community is the last option in settings.
Here, you have the options to add and remove moderators and approved users for your account. You can also block and unblock other users here, meaning neither you nor they can see each the other’s accounts.
There are standards to meet when uploading videos and streaming.
All the content you post online must follow the standards of the YouTube’s Community Guidelines and Terms of Use. Violations get punished appropriately, starting with the deletion of the offending video and a 3-month ban on streaming or uploading. Repeated violations will eventually result in account termination – and depending on the nature of the offending content – it could result in legal action.
You can add a cover picture for your channel.
This option is labelled as ‘CUSTOMIZE CHANNEL’ in the Basic info tab. This sends you to the Channel customization page. There, you’ll find the Add channel art option, which opens a popup, where you have the option of browsing your device’s saved files for a cover picture.
Alternatively, you can also browse your saved pictures on YouTube, or YouTube’s own collection of free cover photos, to select a cover picture for your Channel.
YouTube has recommendations for your cover picture.
According to YouTube, the best dimensions for your cover photo are 2560 pixels by 1440 pixels. Though YouTube automatically adjusts for the best resolution, those dimensions work best with YouTube’s software. Cover pictures must also not exceed a maximum file size of 6 MB.
You have the option to add a description to your Channel.
This option is labelled as ‘Channel description.’ Note that there’s no limit to how many characters or words you can use, but it’s best to be short and straight to the point.
There are additional settings in the Channel customization page.
You can find them using the gear-shaped icon in the upper right part of the page. These settings include whether or not the public gets to see your subscriptions and playlists.
YouTube also offers a premium service.
Originally launched as Music Key in 2014, it became YouTube Red in 2015, and finally YouTube Premium in 2018. A monthly paid subscription, YouTube Premium features ad-free viewing of content, as well as access to exclusive, original content made in cooperation with the site’s partners.
Alongside YouTube Music, YouTube Premium also features audio-only content, as well as the ability to download content from the site.
It’s possible to collapse YouTube’s menus.
You can do this using the icon shaped like 3 horizontal lines stacked on top of each other, located at the upper left corner of the page. The way the menu collapses isn’t always the same, though. In YouTube Studio and other special services, collapsing the menu only hides the labels. The menu options’ icons stay visible. This is also the case on YouTube’s front page.
When watching videos, the icons won’t be visible after you collapse the menu. This keeps them from distracting you from your video. Still, you can use the same method to open the menu any time you want.
YouTube’s video controls are simple and easy to use and understand.
You can find all of them lined up along the bottom of the screen, with the most important ones on the left side. First is the play or pause button, followed by the play next button, which plays the next video on the page’s list of suggested videos.
Note that clicking said button automatically ends your current video if it hasn’t already ended. Placed to the right of the play next button is the total time of the video, along with how much of it you’ve watched already.
You can find more controls on the bottom-right edge of the screen.
First of them is the option to turn captions on, though this option is only available if the video has captions in the first place. Next to it are video settings, followed by the mini-player, then theater view, and full screen.
Mini-player collapses the screen into a smaller one in a popup at the corner of the screen, allowing you to browse YouTube other options while continuing to watch your video. Theater view stretches the screen across the whole width of the page, while full screen expands the video to play on your device’s screen as a whole.
You can find information about the video you’re watching below it.
The most important of them is the title. Immediately below the title, you can find how many views the video’s received, and when it was first uploaded to YouTube. Below these details is a line break, under which you can see the name of the user who uploaded the video, and the number of subscribers they have.
The video’s description follows, but Youtube may not show its entirety if it’s too long. If this is the case, use ‘SHOW MORE’ to see the rest of the description, and ‘SHOW LESS’ to collapse it again afterward if you want.
The Subscribe button sits next to the uploader’s name.
The icon is big and red, with white letters spelling out ‘SUBSCRIBE’. Clicking it causes YouTube to automatically process your subscription to the user who uploaded the video. Clicking it when you’re already subscribed removes your subscription.
The options to like or dislike a video are next to the video’s name.
They’re marked by icons shaped like a thumb up and a thumb down, respectively. You can also see the number of viewers who liked or disliked the video listed next to them. Note that you cannot like and dislike a video at the same time.
Liking a video after you dislike it automatically cancels the dislike, and similarly, disliking the video after you like it automatically cancels the like. If you want to cancel either a like or a dislike without selecting its opposite option, just use the like or dislike button a second time to do so.
You can find more options to the right of the like and dislike buttons.
This includes the share option, marked by an arrow-shaped icon. This icon opens a dropdown menu with all the sites you can share the video to. These include Facebook, Twitter, and Tumblr among others.
You also have the option of sharing your stream at a certain time into the stream, and not from the start. There’s also the ‘SAVE’ icon, which opens a popup listing all your playlists. Select any one of them to add and save the video to your selected playlist.
There’s a dropdown menu to the right of the Save icon.
This menu has 3 options. The first is to report the video and the one who uploaded it for offensive content. Note that the staff will first investigate the issue before taking any action. The second option is to view the video’s transcript, assuming there is one, of course. And the final option is to allow viewers to add translations of any lines in the video to another language.
The comments list is below the video’s description.
At the top of the list is the total number of comments the video has. Next to it are its sorting options, default set with the most popular comments on top, though you can switch sorting to by date, with the newest ones on top. Below the total number of comments and the sorting options, you can find a text box where you can enter your own comments about the video.
YouTube collapses comments that are too long.
This is for convenience’s sake, and you can see the rest of the comment using ‘SHOW MORE’. You can also collapse them again afterward using ‘SHOW LESS’.
You can like or dislike comments too.

Below each comment are icons shaped like a thumb up and a thumb down. Those are for like and dislike, respectively. Listed beside each icon are the number of likes and dislikes the comment has received if any.
Replying to comments is easy.
The option to do so is labelled as ‘Reply’. This opens a text box where you can type and enter your comments. There is no word or character limit for comments, so you can write whatever you want as long as it doesn’t violate any of YouTube’s community standards and terms of service.
YouTube hides most replies to avoid cluttering the page.
Comments with more than 1 reply usually have only the newest comment shown. The rest get collapsed by YouTube, though you can see them using ‘View replies’.
To the right of the comments list is the list of suggested videos.
These videos are usually suggested based on the category of the video you’re currently watching. The Youtube algorithm also takes your preferences into account when suggesting videos, based on what you’ve watched before, and what videos you’ve liked.
The suggested videos’ list has autoplay.
You can find it at the very top of the list. It’s usually off, but there’s slider that turns it on. Once your current video ends, then the one on top of the suggested videos list starts playing.
Note that the suggested videos list gets reset when the next video starts playing. The list you had in the previous video, won’t be the one you’ll get in the next video.
YouTube doesn’t show all comments and suggested videos at the same time.
How many get shown depends on the browser you’re using. Once you reach the end of what’s shown, YouTube automatically updates to add a new set of comments and suggested videos to their respective lists.
An option to buy or rent a video sometimes appears above the suggested videos list.
This is usually the case when the video you’re watching is a clip from a movie or TV series. Depending on who owns the original source and if they have an arrangement with YouTube, YouTube offers you the chance to buy or rent the material. You can see the price on offer for either option, with the icon labeled ‘BUY OR RENT.’
Was this page helpful?
Our commitment to delivering trustworthy and engaging content is at the heart of what we do. Each fact on our site is contributed by real users like you, bringing a wealth of diverse insights and information. To ensure the highest standards of accuracy and reliability, our dedicated editors meticulously review each submission. This process guarantees that the facts we share are not only fascinating but also credible. Trust in our commitment to quality and authenticity as you explore and learn with us.